Wednesday, November 9, 2011

Update: Warm Apple Cider {One Of My Most Favorite Recipes EVER!!!}


I forgot to mention that sometimes I use caramel ice cream topping to make caramel apple cider.... the recipe's been updated.  Click here for the updated version.
Photobucket
Enter your email address:


Delivered by FeedBurner

Monday, November 7, 2011

Samoa Brownie Cookie Bars


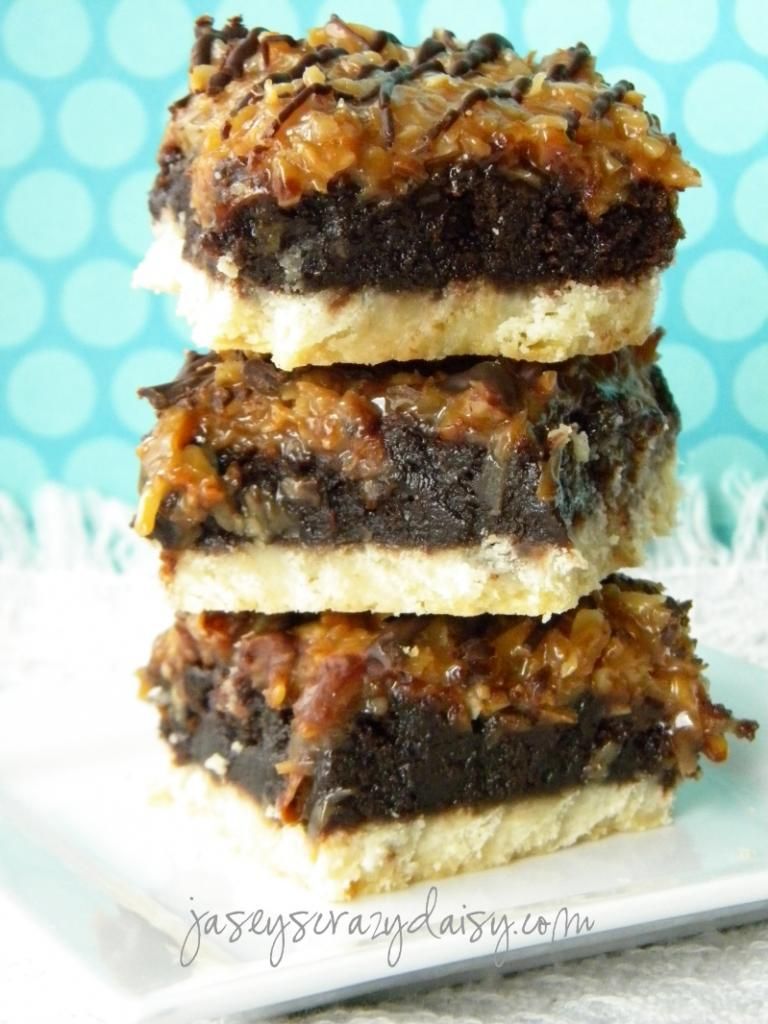
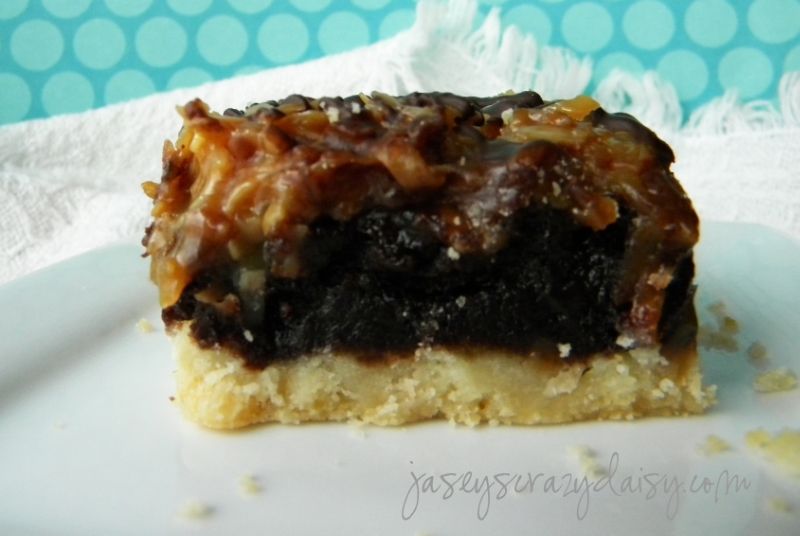
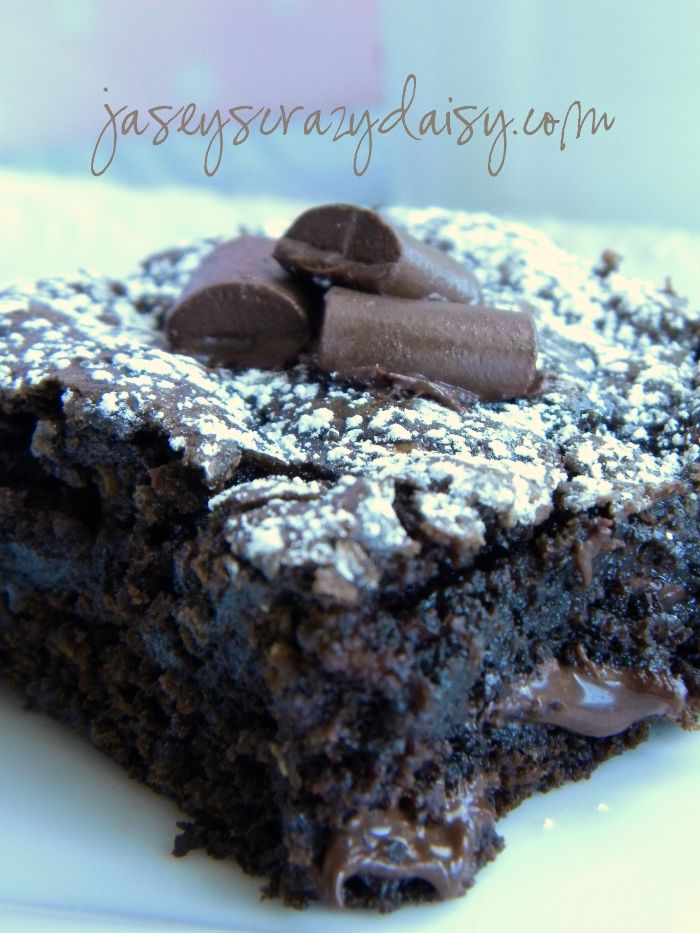
These are so yummy.... they're kind of like those Girl Scout Samoa Cookies, with their shortbread cookie crust, gooey coconut caramel topping and chocolate drizzle, but these naughty little bars sneak in a delightful layer of brownies. Almost like German Chocolate Cake, without the nuts, plus the cookie crust. Whatever you want to call them, these were sooooo good that I had to whisk them out of my house and into the hands of my friends to spread their joyful tastiness, and eliminate the temptation, and what surely would have ended with guilt, of eating the entire batch myself. Yep, I think I would have done it. Thank goodness for friends who are always up for sampling brownie creations, saving me from, well, myself.

Samoa Brownie Cookie Bars
*Recipe By Jasey's Crazy Daisy

Shortbread Crust: (adapted from A Montana Table's Huckleberry Cobbler Crust)
*12 Tablespoons unsalted butter (1 1/2 sticks), cold and cut into cubes
3/4 cups powdered sugar
1 1/2 cups all-purpose flour
*1/2 teaspoon salt

*If you don't have unsalted butter, use salted butter, and leave out the 1/2 teaspoon salt.

Brownie Layer:
1 package brownie mix, I prefer Betty Crocker's Fudge Brownies or Dark Chocolate Brownies

Water, oil, and eggs called for in the directions on the brownie box
1/4 cup hot fudge ice cream topping, straight from the jar, unheated

Coconut Caramel Layer:
3 cups toasted coconut,
1 (17 oz.) jar caramel topping, Mrs. Richardson's Butterscotch Caramel is the only brand I use


Chocolate Drizzle:
1/2 cup chocolate chips

Directions:

Preheat oven to 300. Cover baking sheet with parchment paper. Spread coconut evenly over baking sheet. Bake for about 20 minutes, stirring every 5 minutes to make sure coconut browns evenly. Set aside to cool.

Preheat oven to 350. Combine all crust ingredients and cut with pastry knife, or mix with mixer until coarse pea-sized lumps form. Press evenly over the bottom of a 9 x 13-inch glass baking dish. Bake until lightly browned.

Meanwhile, prepare brownie batter according to package directions, adding 1/4 cup hot fudge ice cream topping, unheated and straight from the jar. Make sure to follow the high altitude directions if you live at high altitude. Pour over shortbread crust and bake as directed, until a toothpick comes out nearly clean with only a few crumbs remaining.

When brownies are almost finished, scoop caramel topping into a heavy bottomed saucepan and heat over low until caramel is soft and easy to stir. Add toasted coconut and stir gently until evenly mixed. If brownies are not quite finished, keep this warm, stirring occasionally. Keeping the coconut caramel mixture warm will help it to spread evenly without tearing brownies apart.

Pour coconut caramel mixture over brownies and gently spread evenly over the top. 

Place chocolate chips into a zip-loc baggie and put into microwave for 20 second intervals. Squish the bag with your fingers to mix and smooth the chocolate between intervals. When melted smooth, snip a tiny piece off of the corner of the bag and drizzle over bars. Cool.

I let these cool for a bit, probably half an hour, and then put them if the refrigerator to finish setting, after sneaking a taste, that is. They are super yummy warm, but cut much more neatly if you wait for them to set. 

I think I will be making quite a few batches of these to use as Christmas gifts. I think they might be my new favorite treat. They might even make an appearance at Thanksgiving. What's on your Christmas baking list?


Photobucket
Enter your email address:


Delivered by FeedBurner

Monday, October 31, 2011

Warm Apple Cider {One Of My Most Favorite Recipes EVER!!!}


A warm cup of this cider is probably the one thing I look most forward to this time of the year, which is actually saying a lot because I love fall flavors.  One of the reasons I love this cider so much is because it is part of our family tradition. Mom always had a batch brewing on Halloween, and now my kiddos and our friends and family enjoy it at our house. I love to keep a big batch warm on Halloween so that when our trick-o-treating friends need a break, they can come in, sit a spell, and enjoy a warm mug of cider. I don't reserve it for Halloween though! I love to serve it on Thanksgiving and Christmas Eve. Besides tradition, this cider is spiced just right and isn't packed with caffeine or any extra sugar, but you'd never know it's missing from a taste. Sometimes I make a batch, let it cool, and pour it back into it's original juice container to store in the fridge. This way, it's only a  minute or so in the microwave to perfect cider whenever we want it.

Warm Apple Cider
*Recipe By Crazy Daisy

1 gallon apple juice, cranberry is pretty yummy too
5 cinnamon sticks*
9 whole cloves
9 whole allspice
cheesecloth, optional

 *Note~ if you purchase cinnamon sticks from the baking isle in glass jars or metal tins, you will need 5 cinnamon sticks. However, you can also find bags of cinnamon sticks in the ethnic cooking section. These cinnamon sticks are ginormous and way way cheaper so I have started using them! If you do use the sticks that come in the bag, I find that using three works perfectly. Since they are so big, 5 makes it a little too strong. Also, if you don't want to mess around with making a spice packet, you don't have to - you can let your spices float around on the bottom and either strain it, or carefully ladle around them. You just have to make sure you don't leave any spices floating in the bottom of someone's mug because you don't want anyone to choke!

First, you need to make a spice packet. To do this, unroll your cheesecloth so that it lays flat. It should still be folded into 3-4 layers. Cut off a rectangle big enough to wrap around your cinnamon sticks. Also, cut a 1 to 1 1/2 inch strip to use as a tie. Place spices into the center of cheesecloth and wrap in to a bundle. Tie strip securely around packet. Place spice packet on the bottom of a large soup kettle. Pour juice over packet into kettle. Bring to a boil, then simmer for about half an hour or until cider is spiced to taste. Remove spice packet. Ladle into mugs and enjoy! If you have any leftovers, let them cool completely and use a funnel to pour cider back into your original juice container. Store in refrigerator and microwave by the mug as needed. 

I have also used my crock pot to serve this cider. You can either make as directed above and pour it into a crock pot, set it to warm or low, and keep a ladle and some mugs handy for serving or you can place the spice packet into the crock pot, pour your juice over the top and heat until spiced to taste, remove the spice packet, turn to warm or low and enjoy!

For a Caramel Apple Cider place a caramel into the bottom of your mug, pour your hot cider on top, and stir to melt or add a teaspoon of caramel ice cream topping (I love Mrs. Richardson's Butterscotch Caramel). Yummy!

I hope you will enjoy this recipe as much as we do. It really is one of our favorites. I plan to share how I use it for gifts in a couple of weeks, complete with a free printable!
Photobucket
Enter your email address:


Delivered by FeedBurner

Tuesday, October 25, 2011

Chili Meat Recipe Revisited


If you have tried my Chili Meat, the recipe has been adjusted to be more user friendly. Make sure to update your recipe boxes~ if you haven't made it yet, what are you waiting for?!?!

Click here for the updated recipe.

PS - Have you entered the fabulous slow cooker cookbook giveaway yet? Click here to enter.
Photobucket
Enter your email address:


Delivered by FeedBurner

Tired of Crock Pot Flops? Kid's Favorite Fondue {and Slow Cooker CookBook Giveaway}


I'm not sure about you, but I have fallen victim to some serious crock pot flops! Yuck! In fact, until recently, I was actually afraid to use them because I was afraid of coming home to something gross not even resembling something I would call dinner, let alone actually feed to my family. That being said, with the craziness of my family's schedule, soccer practices, violin lessons, flag football, swimming lessons, and on and on, I actually dusted mine off and have had some pretty successful attempts at crock pot cooking lately! Whew! However, I still feel pretty limited as to what I might try to make in one. That is until I received this new cookbook in the mail. 

It's called 150 Best Slow Cooker Recipes and has recipes to fit all occasions and tastes! Some of the recipes that I can't wait to try include, Sumptuous Spinach and Artichoke Dip, Chicken and Dumplings, Chili with Black Beans and Grilled Chicken, Zesty Seafood Chowder, Apple Cranberry Upside-Down Cobbler, and Old-Fashioned Gingerbread (the list doesn't stop there). And if the recipes weren't enough, this book features a section highlighting each recipe's specialties (entertaining worthy, vegetarian friendly, can be halved) along with recipe specific tips and is packed with lots of extra crock pot information to help make sure your slow cooker meals turn out yummy every time! When I asked my kids what they might like, they picked Kid's Favorite Fondue. It looks yummy, kind of like a pizza dip. Want a peak?

Kid's Favorite Fondue
 Serves 6

Thanks to my dear friend, Marilyn Linton, writer, editor and volunteer extraordinaire, for this oh-so-easy “fondue.” Creamy and delicious, it is a great hit with adults as well as kids. Give everyone their own fondue fork and serve with thick slices of French baguette, quartered, celery sticks or slices of green pepper.

Small (maximum 312 quart) slow cooker
Blender or food processor
Fondue forks

1 can (28 oz/796 mL) tomatoes with juice, 1, (see Tip, left)
1 tsp dried oregano, 5 mL
1 tsp salt, 5 mL
Freshly ground black pepper                                                         
3 cups shredded Cheddar cheese, 750 mL
Sliced baguette
Celery sticks
Sliced green pepper

1.  In a blender or food processor, process tomatoes until relatively smooth. Transfer to slow cooker stoneware. Add oregano, salt, and pepper to taste, and cook on High for 1 hour, until tomatoes are bubbly.
2.  Add cheese to slow cooker in handfuls, stirring to combine after each addition. Reduce heat to Low and serve, or cover and keep on Low until ready to serve. Using fondue forks, dip bread or vegetables into fondue.

v Vegetarian Friendly / pg 32
Tip
If you’re in a hurry, bring the tomatoes to a boil on top of the stove after they have been processed. Then transfer to the slow cooker. Reduce the cooking time in Step 1.

Excerpted from The 150 Best Slow Cooker Recipes, Second Edition by Judith Finlayson Photograph by Colin Erricson © 2011 Robert Rose Inc. www.robertrose.ca Reprinted with permission. All rights reserved.

I'm thinking this would be so good with soft warm bread sticks, don't you think? Would you like your own copy? I've got a copy up for grabs for one JCD reader! All you have to do is leave a comment under this post telling me what your favorite slow cooker recipe or tip is. This giveaway is only open to JCD followers, so if you aren't one already, make sure to click follow (above right), or like.


This giveaway opens immediately and ends Tuesday, November 1, 2011 at noon. The winner has 24 hours to claim their prize or a new winner will be drawn. This giveaway is only open to residents of the US and Cananda.


*Disclaimer - I was provided a cookbook for review, but all opinions remain my own. No money was compensated.
Photobucket
Enter your email address:


Delivered by FeedBurner

Wednesday, October 19, 2011

Cheesy Bacon Roasted Potatoes


I have an addiction. To potatoes. Specifically Dickey's Baked Potato Casserole. I have been working on my own copycat version, and I am almost happy with it. But one day I didn't feel like mashed potatoes, I wanted roasted potatoes. Enter these Cheesy Bacon Roasted Potatoes. They are packed with the same flavors of  the potato casserole, minus the mashing, maybe a little butter, and probably sour cream and even cream cheese to top it off (super healthy, I know). I think I have a new addiction. To these potatoes. Let me introduce you to them.

Cheesy Bacon Roasted Potatoes
*Recipe by Crazy Daisy

3-5 lbs potatoes, red or yukon, rinsed and cut into 1-inch chunks, enough to spread over the surface of the pan (sometimes it takes all 5 pounds, sometimes not)
1 package bacon chopped into 1/2-inch slices
1/2 onion, chopped
5 cloves garlic, minced or grated
3 Tablespoons olive oil
1 teaspoon pepper
1/2 teaspoon kosher salt
10 green onions, sliced
1/2 to 1 cup shredded cheese, use as much as you'd like ( I like Cheddar, or Colby Jack)

*Note - You may want to add more salt after tasting the potatoes are finished. You never know how much salt the bacon is going to add, so I start with less knowing I can always add more.

Preheat oven to 450. Cover a Texas sheet cake pan with foil and spray with cooking spray. Spread potatoes evenly in pan. Sprinkle bacon, onion, and grated garlic evenly over the top of the potatoes. Drizzle with olive oil. Sprinkle with pepper and salt. Use a wooden spoon, or your hands, to mix everything together until well coated. Make sure everything is spread out evenly when you are finished. Place pan in oven and cook for 15 minutes. Stir. Cook another fifteen minutes. Stir again. Meanwhile, slice green onions. If the potatoes look like they are starting to brown, sprinkle onions over potatoes and cook for another fifteen minutes. If everything is not browned and crispy to your liking, cook for another 10-15 minutes or until done. Make sure to keep stirring between cooking intervals. This keeps everything browning evenly. I try to put the green onions on for the last 10-15 minutes only, this way they are sort of crisp tender and don't loose their flavor. When your potatoes are finished, take them out of the oven and sprinkle with cheese. Let the cheese melt and serve. Enjoy!

What are your favorite kind of potatoes?
Photobucket
Enter your email address:


Delivered by FeedBurner

Thursday, October 13, 2011

Remember these? {Buffalo Wing Bites}


Remember these cheesy buffalo wing bites of yumminess? Somehow they got lost.... but they are back. You can find them in my Recipe Box, or simply click here. Whew! Just in time for football. What's football without food? Not very exciting. Saved!

Did you here about our latest giveaway? From The Twinery? Check it out!
Photobucket
Enter your email address:


Delivered by FeedBurner

Wednesday, October 12, 2011

Baker's Twine Review and Giveaway {The Twinery}

*Image from The Twinery
Have you seen all the totally fun ways everyone is using baker's twine? It's everywhere! I've seen it used for scrap booking and card making, gift wrapping, and in so many crafts that I can't even begin to count them! Recently, the Twinery,  sent me one of their sample packs to check out, and I can't tell you how much I love their product. Their twine is easy to use high quality twine with crazy vibrant colors. The possibilities for using it are endless. Remember this back to school printable project?
 Well, this is what it looked like before I added the twine. 
You could totally get by not using it, but look how much cuter and more polished it looks embellished with the twine!
This is just one of the ways that I have found to use the twine! I have some more printables that are almost ready to share with you and I just can't wait to package some Crazy Daisy treat packages using these twine bows:
*Image from The Twinery
They call them "pansy bows" in the tutorial posted on their blog, but they totally remind me of daisies, and I think they could totally become my signature wrapping if I tie them using their pink sorbet twine. And guess what? Check out what was on The Twinery Blog today...
*Image from The Twinery
Complete with recipe and free printable gift tag! Pretty cute all tied up with baker's twine.

The Twinery is offering JCD readers a chance to win one of their amazing sampler packages! I felt like it was Christmas when my package arrived, I hope you are as excited as I am!

To Enter:

This giveaway is only open to JCD followers. So before you complete your entries, make sure you either follow this blog using Google Friend Connect, or like JCD on Facebook. Once you are a follower, here's how you enter. (two entries)

1) Head over to The Twinery's blog and check out all their crafty ideas! When you are finished come back here and leave me a comment telling me your favorite project, color, or how you would use your twine!

2) Head over to The Twinery's Facebook page, click like, and tell them what you love about their twine! Then come back here and leave me a comment telling me that you did so.

That's two ways to enter! You can choose one or do them both. Just make sure to leave me a comment for each entry or they may not be counted.

This giveaway opens immediately and ends Wednesday, October 19th at noon. Once the winner's eligibility has been confirmed, they have 24 hours to claim their prize or a new winner will be drawn. What are you waiting for? Hurry and enter!

Disclosure- I was provided with a sampler pack of twine to review, however, all opinions remain my own. Their was no monetary compensation.

Photobucket
Enter your email address:


Delivered by FeedBurner

Friday, October 7, 2011

Cinnamon Crackle Zucchini Bread


While fall is still in the air, and you may still find zucchini in your kitchens, I thought I would share another one of my favorite zucchini recipes with you. I received a loaf of this bread as a gift once and had to have the recipe. Thanks, Genny! Since, I have adjusted the method, amount of sugar, and added a yummy crackle topping. I love how the sweet yummy spices pair with the crunchy cinnamon crackle topping. Plus, I love how you end up with two loaves, one to keep and one to share. Give it a try, I don't think it will disappoint.

Cinnamon Crackle Zucchini Bread
Recipe by Crazy Daisy adapted from Genny Schaffner

3 cups flour
1 teaspoon salt
1 teaspoon baking soda
3 1/2 teaspoons cinnamon
1 teaspoon allspice
3 eggs
1 cup oil
1 1/2 cups sugar (you can add or subtract 1/2 cup depending on how sweet you like things)
2 cups grated zucchini
3 teaspoons vanilla

Cinnamon Crackle Topping
2 Tablespoons white sugar
2 Tablespoons brown sugar
1/2 teaspoon cinnamon

Preheat oven to 325. Grease and flour two 9x5 loaf pans. In medium bow, whisk together flour, salt, baking soda, cinnamon, and allspice. Set aside. In mixing bowl, cream together eggs, oil, and sugar. Add zucchini and vanilla and stir well.  Slowly, stir in the dry ingredients and mix until everything is just wet and incorporated. Pour evenly into prepared pans. Bake for one hour, or until bread springs back when touched lightly, or a toothpick comes out mostly clean when inserted in the center of the bread. Let cool on wire rack for 10 minutes and then remove from pan to finish cooling. While yummy warm, I think this bread is actually better cooled and even better the next day.
Photobucket
Very Good Recipe Tags: Quick Breads, Zucchini, Fall Flavors
Enter your email address:


Delivered by FeedBurner

Saturday, October 1, 2011

Got Pumpkin?!?! {Recipe Round Up}

October first, how exciting! It's officially time to break out the pumpkin. Here's some of our favorite pumpkin treats...


I hope to share more of our favorite pumpkin treats with you soon! What are your favorite pumpkin treats? 

If you are interested in more fabulous fall baking treat ideas, click here. Yes, there's lots of pumpkin ideas.
Photobucket
Enter your email address:


Delivered by FeedBurner

Monday, September 26, 2011

Halloween Ghost Ribbon Wreath


It's starting to get a little spooky around here. Fun spooky, don't you think?! Interested in a making a ribbon wreath yourself? Click here for a tutorial.
Photobucket


Enter your email address:


Delivered by FeedBurner

Wednesday, September 21, 2011

Oatmeal Cookie Gelato


While fall is in the air, our afternoons have actually still been pretty nice. We haven't even put our shorts away! Perfect time to add some fall baking flavors to gelato! Oatmeal Cookie is one of the flavors my son and I added to our  gelato collection this summer. I don't know which he likes better, this flavor or the Cake Batter Gelato? Really, I don't think you could go wrong with either.

Oatmeal Cookie Gelato
*Recipe by Crazy Daisy

2 cups milk, whole is best, but I used 2% and it was still super creamy
1 cup heavy cream
4 large egg yolks
2/3 cup sugar
1 teaspoon vanilla
2/3 cup Oatmeal Cookie Mix, not prepared, looks like this
In a heavy-bottom saucepan, combine the milk and cream. Place over medium-low heat and cook, stirring occasionally so a skin doesn't form, until tiny bubbles start to form around the edges and the mixture reaches a temperature of 170 degrees.

Meanwhile, in a heat-proof bowl, whisk the egg yolks until smooth. Gradually whisk in the sugar until the mixture is incorporated, thick, and pale yellow. This next part part is important and keeps you from having scrambled eggs in your gelato - it is called tempering the eggs. Take the mixture off of the heat. Using a ladle, scoop some of the hot milk mixture (after it gets the bubbles) and pour it into the eggs and whisk. Do this one more time, make sure to whisk well so the eggs don't have a chance to cook into scrambled eggs. Now slowly pour the egg mixture into the rest of the hot milk mixture, in the saucepan, whisking until incorporated. Pour in cake mix and vanilla and whisk again until well mixed. Return to heat and cook on low. Cook, stirring constantly with a wooden spoon until the custard is thick enough to coat the back of the spoon and/or it reaches a temperature of 185. Do not let it boil. 

Pour the mixture through a fine-mesh strainer into a clean freezer-safe bowl. Add cookie mix and stir until mixed evenly. Let cool, stirring about every 5 minutes. Once, mixture reaches about room temperature, cover with plastic wrap - gently pressing it down until it touches mixture to prevent a skin from forming. Refrigerate for at least four hours, but overnight is best. Pour mixture into container of ice cream machine and churn as directed. Transfer to airtight container and refrigerate for two hours before serving. Let gelato set out for 10-15 minutes before serving. 

Hope you are finding time in all the fall craziness to enjoy those last few sunny afternoons. Enjoy!
Photobucket
Very Good Recipe Tags: Gelato, Desserts
Enter your email address:


Delivered by FeedBurner

Thursday, September 15, 2011

Are You In the Market for Some Custom Flyers? {Uprinting Flyer Giveaway}


If you haven't ever heard of UPrinting, now is a great time to check them out! I created my personal blog cards using their services. Aren't they cute?


UPrinting is one of those printing companies that offers a variety of printing services, such as flyer printing. You can also check out their club flyers. The great thing about these flyers is that they can be used for just about anything. Since you control the design process, you can create whatever you can imagine. They are perfect for save the dates, party invites, announcements, charity's special events and the like. I think I may design stationary cards to use for my JCD blogging adventures. There have been several occasions that I wished I had something to send a note on or include in a giveaway package. Are you interested in creating some flyers of your own? Uprinting is offering Jasey's Crazy Daisy readers a chance to win 250 custom flyers!

Prize details include:
One winner will receive 250 flyers. You can choose from two sizes: 4.25" x 5.5" or 4" x 6". The cards are printed on 14 pt glossy cardstock,  with front printing only. There will be a 3 business day turnaround and free shipping. This giveaway is limited to US residents 18 years old and above only.


How to win?
You must be a JCD reader, either with Google Friend Connect or Facebook to qualify for this giveaway. If you aren't a JCD follower, what are you waiting for?


Now just:
1. Leave a comment under this post describing what kind of flyer you might design. 
2. Head over to the UPrinting Facebook page, click like and tell them you are excited about the giveaway at Jasey's Crazy Daisy. Come back and leave a comment under this post telling me you did so.
3. Visit Uprinting's Twitter page, click follow, and leave a note telling them JCD sent you. Come back and leave a comment under this post telling me you did so.

That's up to three entries! Please remember to come back and leave a comment, under this post, for each option you choose or your entries may not be included in the drawing. 

This giveaway is open immediately. You have until noon September 24th, 2011 (Mountain Standard Time) to enter. After eligibility is confirmed, winner will be contacted directly. The winner will have 24 hours to claim their prize or a new winner will be drawn.

Disclaimer -This giveaway is sponsored by UPrinting, no monetary compensation was given and I will receive a party flyer for hosting. For more information about flyers, please visit Uprinting.com.
Photobucket

Enter your email address:


Delivered by FeedBurner

Wednesday, September 14, 2011

Mocha Coconut Creme Frappucchino {and Keurig Review}


Have you ever heard of a Keurig? I hadn't until recently. Let me count the ways I love it... No measuring. No soggy coffee grounds. No messy coffee pot. No waste. Delicious yumminess in minutes. 200 plus varieties to choose from, including teas, cocoas, and even apple cider. I believe the list goes on, but what more do you really need to know? They come in different colors. They are even kind of cute...
*Image from keurig.com


This is the MINI Keurig Plus. In under two minutes, you can have your favorite beverage, warm or iced, and even chose from three different sizes. There are even bigger, faster brewers, if that's more your style. With so many K-cup varieties, there is something for everyone in your family. My husband loves the coffee and chai tea and I love spoiling him with a travel mug in the morning, especially since it is so easy. The kiddos love the apple cider and cocoa. My six year old loves using it to make is favorite noodle soup. He pours his noodles in the bowl. Brews plain water over his noodles. Lets it sit just a minute and enjoys. I really like the iced half tea half lemonade and dark hot chocolate. You might remember from these brownies that I have an obsession for Starbucks Mocha Coconut Creme Frappuccinos. Well, I used my Keurig to create my own homemade version. So yummy!

Coconut Creme Frappuccino {Homemade Starbucks}
*Recipe by Crazy Daisy

Keurig K-cup, choose your favorite bold flavor ( about 5.25 oz.)
2 Tablespoons chocolate syrup
1/2 cup Coconut Creme Creamer
1-2 cups of ice, depending on your preference
whipped cream, optional of course

Using your K-cup, select the small (5.25 oz.) setting and brew into a mug. Chill until cold. Sometimes I do
this the night before, sometimes I pop it into the freezer for 15-30 minutes to hurry it along. Pour your cold coffee, chocolate syrup, and coconut cream creamer into your blender pitcher. Add ice and blend until you reach your desired consistency. I like mine slushy so I add 2 cups of ice and blend well. Super yummy!

If you have a second, stop by Keurig's facebook page and say hello for me! I'm sure they'd love to know what your favorite is!

*I received a MINI Keurig Plus for review, however, all opinions are my own. No monetary compensation was given.
Photobucket
Very Good Recipe Tags: Coffee, Beverages
Enter your email address:


Delivered by FeedBurner

Friday, September 9, 2011

Peach Cobbler Gelato


I love this time of the year, mostly because of the flavors. Crops are ready, and not only do we find our kitchens loaded with peaches, zucchini, tomatoes, and other fabulous and fresh yummies, we can start thinking about pumpkin! Who doesn't love pumpkin? For today though, thanks to our Facebook friends, we are going with peach! Usually, I make peach cobbler, but it has still been warm enough to entertain frozen treats, our favorite being homemade gelato. I've got a few more flavors to share with you {one in the freezer waiting to be photographed}, but with all those juicy ripe peaches out there, this is perfect for the here and now! Now you don't have to wonder what happens when cobbler marries gelato.

Peach Cobbler Gelato
*Recipe by Jasey's Crazy Daisy

2 cups milk, whole is best
1 cup heavy cream
4 large egg yolks
2/3 cup sugar, divided
3 peaches, {@ 2 cups peeled and chopped}
1/2 teaspoon vanilla
1/2 teaspoon cinnamon
1/2 lemon, juiced

In a heavy-bottom saucepan, combine the milk and cream. Place over medium-low heat and cook, stirring occasionally so a skin doesn't form, until tiny bubbles start to form around the edges and the mixture reaches a temperature of 170 degrees.

Meanwhile, in a heat-proof bowl, whisk the egg yolks until smooth. Gradually whisk in the 1/3 cup sugar until the mixture is incorporated, thick, and pale yellow. This next part part is important and keeps you from having scrambled eggs in your gelato - it is called tempering the eggs. Take the mixture off of the heat. Using a ladle, scoop some of the hot milk mixture (after it gets the bubbles) and pour it into the eggs and whisk. Do this one more time, make sure to whisk well so the eggs don't have a chance to cook into scrambled eggs. Now slowly pour the egg mixture into the rest of the hot milk mixture, in the saucepan, whisking until incorporated. Return to heat and cook on low. Cook, stirring constantly with a wooden spoon until the custard is thick enough to coat the back of the spoon and/or it reaches a temperature of 185. Do not let it boil. 

Pour the mixture through a fine-mesh strainer into a clean freezer-safe bowl. Let cool, stirring about every 5 minutes. Once, mixture reaches about room temperature, cover with plastic wrap - gently pressing it down until it touches the mixture to prevent a skin from forming.

Meanwhile, in a food processor, pulse peaches, cinnamon, vanilla, 1/3 cup sugar, and lemon juice until pureed. You will add the peach mixture to the custard mixture after it has cooled. You can either fill your sink with ice and place the custard bowl in an ice bath to quicken the process, or put it in the fridge and wait. Once the custard is cool, stir in the peach puree. Then refrigerate.

Refrigerate for at least four hours, but overnight is best. Pour mixture into container of ice cream machine and churn as directed. Transfer to airtight container and refrigerate for two hours before serving. Let gelato set out for 10-15 minutes before serving.

What to post next? More gelato? The yummiest potatoes ever? My favorite zucchini bread?

Photobucket
Very Good Recipe Tags: Gelato, Desserts
Enter your email address:


Delivered by FeedBurner

Monday, August 29, 2011

Chocolate Chunk Zucchini Brownies {with a gluten free recipe option}

One summer afternoon, long ago when I was a little girl, I remember baking zucchini brownies with my aunt thinking, "Is she seriously going to put that green stuff in our brownies?!?!?!" They baked. They cooled. We tasted, I thought, "Are these the same brownies? The ones with the green stuff?" They were so yummy! No hint of anything green, just pure chocolately goodness. And if you eat them after they have cooled a little, the chocolate chunks are kind of soft and melted and gooey. In fact, after stating that he was ready to try some of those "BIKINI" brownies, my son declared, "How did you get the frosting on the inside?" I was tempted to top my warm brownie with a giant scoop a vanilla ice cream and a drizzle of hot fudge{I promise, that would have earned a place in the sundae hall of fame} except for the small fact that it's not even ten o'clock in the morning, AND I have been working really hard to consciously eat better... the whole smart choices and smaller proportion thing. By the way, the one I ate, it was totally worth it!

Chocolate Chunk Zucchini Brownies
*Recipe adapted from my aunt, Sue Bodner, by Crazy Daisy


2 cups flour
1 teaspoon salt
1 1/2 teaspoon baking soda
1/2 cup cocoa
1 1/4 cups sugar
1/2 cup Canola oil
2 eggs
2 teaspoons vanilla
2 cups shredded zucchini
1 cup chocolate chunks

*Note~ This is a fantastic gluten free brownie when Bob's Gluten Free All-Purpose Flour is substituted for the regular flour and if gluten free chocolate is used. I think the moisture from the zucchini helps keep the gluten free texture soft and yummy!


Preheat oven to 350. Spray 9x13 pan with cooking spray. In a medium bowl, whisk together flour, salt, baking soda, and cocoa. Set aside. In mixing bowl, cream together sugar and oil. Add egg and vanilla, beat until until incorporated. Stir in zucchini. Add dry ingredients and beat until mixed well. Add chocolate chunks, mixing well. Pour into prepared pan and bake for about 25 minutes or until a few crumbs come remain on toothpick after inserted into the middle. Cool slightly and dust with powder sugar, or frost, or simply enjoy as is.

We're off to enjoy our day... we are going for a bike ride.... and to get the rest of these brownies out of my house and to deliver some treats to some friends.
Photobucket
Very Good Recipe Tags: Brownies, Desserts, Zucchini
Enter your email address:


Delivered by FeedBurner

Sunday, August 28, 2011

Wishing You a Happy First Day of School {Free Back to School Printable}


It's that time of year again! We are busy getting ready to head back to school. I have to admit that it's my least favorite time of the year. While my son counts down the days until he gets to go back to school, see his friends, his teacher, and to learn, I am singing the Back To School Blues. He is so excited. I am anything but excited. I miss him already. I am sad, sad for myself. But really, I am thrilled for him. I love that he loves school, is so eager to learn, and has an amazing group of little buddies to play with. I wouldn't want it any other way, but that doesn't make it any easier. I wanted something fun to sneak in his lunch box, just to let him know I was thinking of him and hoping his day was happy. It turns out I wasn't so sneaky. He saw me working on the idea and wants to take them to share with his classmates.  Maybe we will just have to make some extras for my mom to take to her new fifth graders! Wouldn't they be a fun surprise to get from your teacher? However you decide to use them, I hope you have some fun adding a little happiness to someone's day.


Happy First Day of School Apples
*by Crazy Daisy

You'll need:
White card stock, they print 6 to a page, so plan according
Scissors
Hole punch
Gummy worms, at least one per printable
Embellishments, I used Pea Pod twine from The Twinery
Treat bags, optional, but I like because the worms aren't wrapped. I used the Wilton 4x9.5-inch ones from the baking isle at Walmart

Use the below Scrib'd link to download and print apples. Cut the apples out. I kept the boxes around them so they would sit straight in the treat bags, but you could cut the apple only if you wanted. Use hole punch to cut holes in the upper right corner of your apple. Punch four or five holes overlapping with each other to make it appear as if a worm has chewed through the apple. Insert gummy worm into the hole so that the face is in front. Embellish as desired, if you want. Place in treat bag, and tie. Wouldn't it be fun to line the bottom of the bag with extra worms?


Happy First Day of School Apple

For some reason, the words appears fuzzy, but they print just fine. Enjoy those last few summer days! What do you do to make that first day extra special?
Photobucket
This project is participating in
Visit thecsiproject.com
Enter your email address:


Delivered by FeedBurner